
Running local LLMs has become significantly more practical with modern consumer GPUs. What started as experimentation with local inference quickly evolved into a lightweight AI infrastructure setup capable of powering development tools, coding assistants, automation workflows, and remote AI agents from anywhere.
In this article, I’ll walk through how I built a local LLM environment on my Windows machine using LM Studio and exposed it securely over the internet so it could be used from another network, including work laptops, VSCode extensions, and automation platforms like n8n.
The Goal
The primary objective was simple:
- Run a local LLM on my home PC using my GPU
- Access the model remotely from another network
- Use it with:
- VSCode Continue.dev
- OpenAI-compatible applications
- AI agents
- n8n workflows
- future Laravel integrations
- Avoid direct router port forwarding
- Keep the setup secure and maintainable
This eventually became a lightweight self-hosted AI infrastructure stack.
The Hardware
The setup was powered by a consumer gaming PC equipped with:
- RTX 5060 Ti 16GB
- Ryzen CPU
- 32GB RAM
- Windows 11
The GPU memory was sufficient for running smaller and mid-sized coding models comfortably through LM Studio.
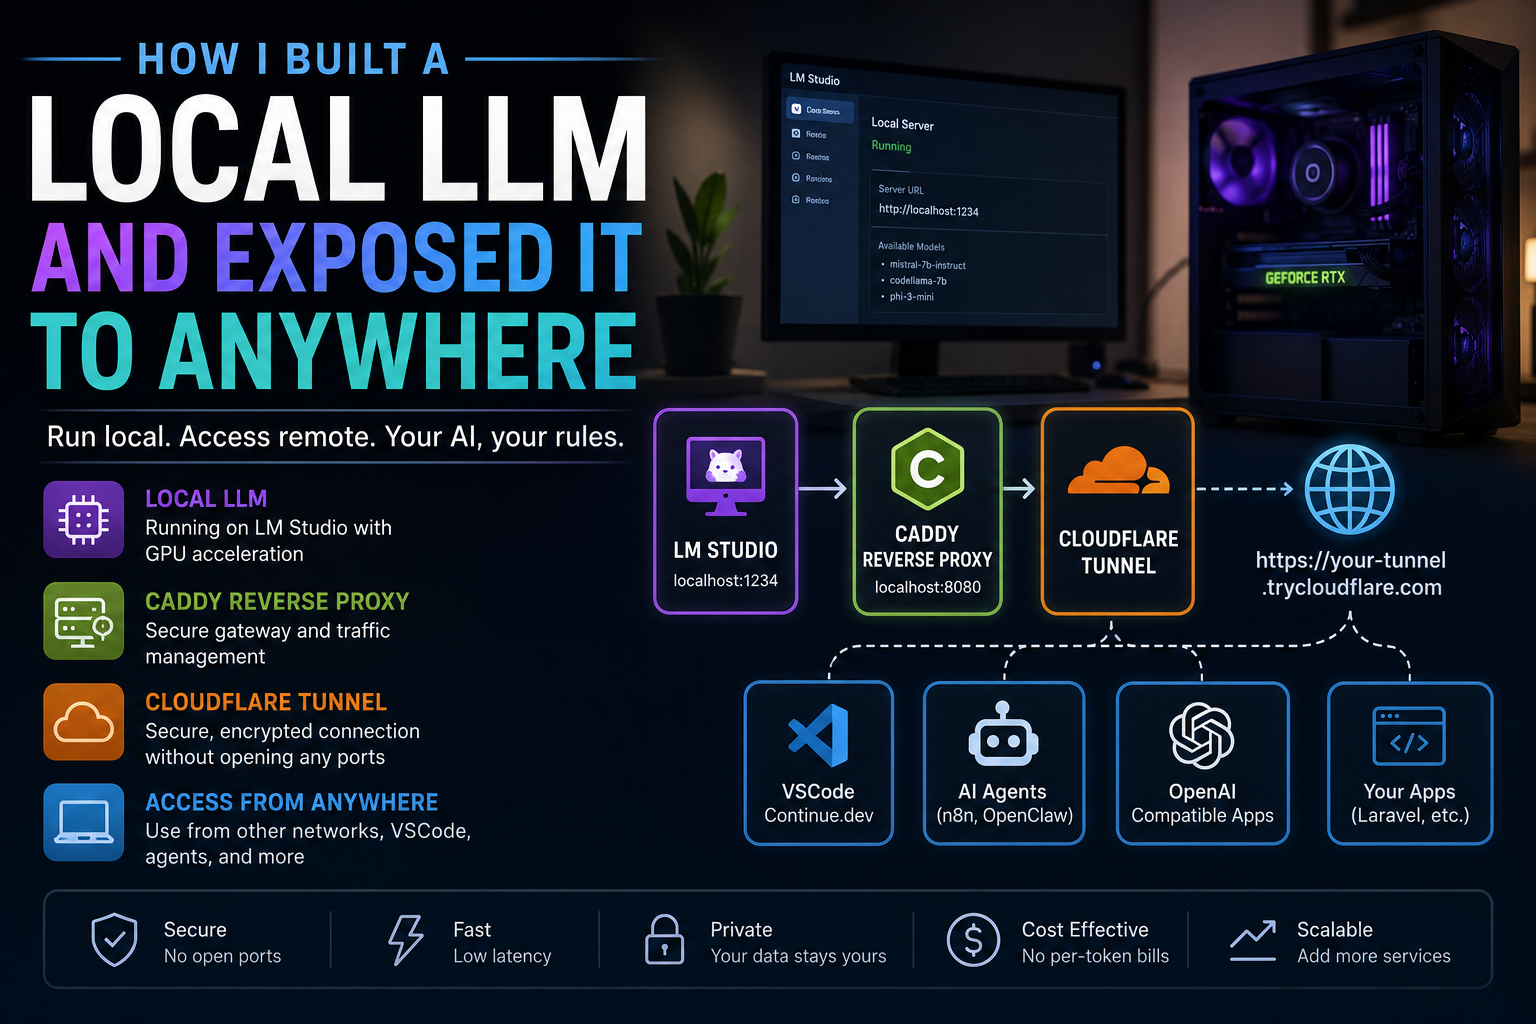
The Core Components
The architecture consisted of four major components:
LM Studio
→ Caddy Reverse Proxy
→ Cloudflare Tunnel
→ Remote Clients
Each layer had a specific responsibility.
Step 1 — Running the Local LLM
I used LM Studio because it provides:
- local model management
- GPU acceleration
- OpenAI-compatible APIs
- simple server controls
- support for GGUF models
Once the model was downloaded, LM Studio exposed an OpenAI-compatible API locally:
http://localhost:1234/v1This immediately made the local model compatible with:
- Continue.dev
- OpenAI SDKs
- n8n AI Agents
- Open WebUI
- custom applications
Testing the endpoint:
curl http://localhost:1234/v1/modelsAt this stage, the API was only available on my local machine.
Why I Did NOT Expose LM Studio Directly
Exposing LM Studio directly to the internet would have been risky because:
- no proper public authentication
- no rate limiting
- no HTTPS termination
- no routing controls
- no centralized gateway
Instead, I introduced a reverse proxy.
Step 2 — Introducing a Reverse Proxy
I used Caddy as the reverse proxy.
The purpose of the reverse proxy was to:
- act as the public-facing gateway
- forward traffic internally
- allow future authentication
- centralize networking
- support multiple services later
The architecture became:
Internet
→ Caddy
→ LM Studio
My Caddy configuration:
:8080 {
    reverse_proxy localhost:1234
}
Now instead of exposing LM Studio directly:
localhost:1234I exposed:
localhost:8080Caddy handled all incoming requests and forwarded them internally to LM Studio.
Understanding Reverse Proxy Architecture
A reverse proxy is essentially a traffic manager.
Instead of clients connecting directly to internal applications, they connect to the reverse proxy first.
This provides several advantages:
- centralized security
- HTTPS management
- routing
- authentication
- abstraction of internal services
The reverse proxy becomes the single entry point for all applications.
Future expansion becomes straightforward:
llm.domain.com {
    reverse_proxy localhost:1234
}

n8n.domain.com {
    reverse_proxy localhost:5678
}

app.domain.com {
    reverse_proxy localhost:8000
}
Step 3 — Exposing the API Securely with Cloudflare Tunnel
Rather than opening firewall ports or configuring router forwarding, I used Cloudflare Tunnel.
This was one of the most important architectural decisions.
Cloudflare Tunnel works by:
- creating an outbound encrypted tunnel from the PC
- securely routing traffic through Cloudflare’s network
- avoiding direct inbound exposure
The flow became:
Remote Client
→ Cloudflare
→ Tunnel
→ Caddy
→ LM Studio
Starting the tunnel was surprisingly simple:
cloudflared tunnel --url http://127.0.0.1:8080Cloudflare generated a public HTTPS endpoint:
https://random-name.trycloudflare.comAt this point, the local LLM was accessible securely from anywhere.
Why I Used 127.0.0.1 Instead of localhost
One issue I encountered was:
Unable to reach the origin serviceThe problem was that localhost resolved to IPv6 (::1) while Caddy was listening on IPv4.
Switching to:
127.0.0.1resolved the issue immediately.
This is a subtle but common networking issue on Windows.
Using the Local LLM from Another Network
Once the tunnel was active, the endpoint became:
https://random-name.trycloudflare.com/v1This allowed remote applications to use the local model exactly like OpenAI APIs.
Using Continue.dev with the Remote LLM
One of the most practical integrations was VSCode Continue.dev.
The configuration looked like this:
{
  "models": [
    {
      "title": "Home LM Studio",
      "provider": "openai",
      "model": "local-model",
      "apiBase": "https://random-name.trycloudflare.com/v1",
      "apiKey": "dummy"
    }
  ]
}
This effectively transformed my home PC into a remote AI coding server.
Now my work laptop could:
- use my home GPU
- run coding assistants
- generate code
- explain repositories
- create components
- review Laravel/Vue code
all remotely.
Integrating with n8n and AI Agents
Since LM Studio exposed an OpenAI-compatible API, it also integrated easily with:
- n8n AI Agent nodes
- OpenAI SDKs
- custom Laravel applications
- OpenClaw-style agents
- automation systems
This meant my local infrastructure could power:
- research agents
- developer agents
- workflow automation
- document analysis
- content generation
without paying per-token cloud costs.
Security Considerations
This setup works extremely well, but security matters.
Key lessons:
- never expose raw local services directly
- avoid router port forwarding
- use reverse proxies
- prefer tunnels over open ports
- eventually add authentication
For production-grade usage, the next steps would include:
- Cloudflare Access authentication
- API key validation
- rate limiting
- request logging
- named Cloudflare tunnels
- custom domains
Final Architecture
The final infrastructure looked like this:
Work Laptop / Remote Apps
→ Cloudflare Tunnel
→ Caddy Reverse Proxy
→ LM Studio
→ Local GPU
This architecture is surprisingly scalable for:
- local AI labs
- self-hosted development assistants
- agent-based workflows
- remote GPU inference
- private coding copilots
Final Thoughts
What started as a local AI experiment became a lightweight distributed AI infrastructure.
The most important realization was this:
Modern local LLM infrastructure is no longer just about running models locally. It is about exposing those models safely, integrating them into development workflows, and treating them like internal platform services.
With a consumer GPU, reverse proxy, and secure tunnel, it is now possible to build highly capable AI systems from home infrastructure that integrate seamlessly with professional workflows across networks and devices.